Saturday, December 19, 2009

Red, Red Velvet

I rarely pass up an opportunity to bake something, so when our friend Russ told me about his upcoming bake sale*, I immediately offered to donate some baked goods. He accepted my offer and then I began to think about what I should make. I finally decided upon red velvet cupcakes since I was going to be making them for Christmas and have never made them before.

I made mini cupcakes for the bake sale, however I had a slight issue with the wrappers. I bought mini cupcake wax paper wrappers at my grocery store, but they were slightly too big for my Wilton mini cupcake pan. So the first batch came out with the wrapper folding in on itself and some had uneven bottoms. You can see these in the picture, although I tried to take the best ones. The second batch I decided to not use the wrappers and they looked great, unfortunately I forgot to take a picture of these.

Anyway, other than the wrapper issue, the cupcakes were pretty straight forward. The most important part is the alternating between adding the dry and wet ingredients. This well help you get a smoother batter and prevents gluten from forming. When gluten forms it inhibits baked goods from rising and will make it a denser. The gluten will make the cake more like a bread consistency, instead of a moist cake. So to prevent this, you coat your flour and dry ingredients with a fat first (the butter, sugar, eggs) before adding the other liquids. Also note, you shouldn't add the wet ingredients first because it will break the emulsion formed by the butter and eggs. And be careful not to over beat the batter, that could also lead to gluten forming! If you follow the steps correctly, you should have a wonderful, moist cake.

Here's the recipe I used:

Cupcakes:

  • 1 1/2 cups of sugar
  • 1/2 cup (1 stick) of butter, room temperature
  • 2 eggs, room temperature
  • 2 1/3 cups of cake flour
  • 2 tablespoons of Dutch-processed cocoa powder
  • 1 teaspoon of baking soda
  • 1 teaspoon of baking powder
  • 1/2 teaspoon of salt
  • 1 cup of buttermilk*
  • 1 1/2 tablespoons of red food coloring
  • 1 teaspoon of vanilla extract
  • 1 teaspoon of distilled white vinegar
1. Preheat the oven to 350°F.
2. Beat the butter and sugar in an electric mixer for 3 minutes on medium speed until light and fluffy.
3. Add the eggs, one at a time, beating until each is fully incorporated. Be sure to scrape down the sides of the bowl to ensure even mixing.
4. In a large bowl, sift together the cake flour, cocoa powder, baking soda, baking powder, and salt. In another bowl whisk together the buttermilk, vinegar, vanilla extract, and red food coloring.
5. Add a fourth of the dry ingredients and mix, then add a third of the wet. Continue adding in a dry, wet, dry pattern, ending with the dry ingredients.
6. Scoop into cupcake papers, about 1/2 to 3/4 of the way full. Bake for 18-22 minutes or until a toothpick comes out clean. Rotate the pan after the first 15 minutes of baking to ensure even baking.
7. Allow to cool for one minute in the pan then transfer to a wire rack to cool completely.


Cream Cheese Frosting:

  • 1/2 cup of butter (1 stick), room temperature
  • 8 oz of Philly cream cheese (1 package), room temperature
  • 2 - 3 cups of powdered sugar
  • 1 teaspoon of vanilla extract
1. Cream the butter and cream cheese together, about 3 minutes. Scrape down the sides and bottom of the bowl to ensure even mixing.
2. Add the vanilla extract and mix.
3. Add the powdered sugar, continually taste to get to desired sweetness. Pipe onto cooled cupcakes.

Here was my final result, I hope yours come out just as tasty!


*The bake sale was a fundraiser for Manhattan College's Lasallian Outreach Volunteer Experience (L.O.V.E.). The group will be heading down to New Orleans to help build houses for those to need. Russ is supervising the trip of students and if you're interested in donating to this great program, leave a comment and we'll be in touch!

Sunday, December 6, 2009

GOBBLE, GOBBLE!

Hope everyone had a wonderful Thanksgiving! Mine was great. Doug and I went to his Aunt's house and ate a ton of delicious food. The next day I was lucky enough to go to my parents' house and hang out with them, my brother and sisters and eat tons of leftovers. I think I ate turkey, stuffing, mashed potatoes, etc for a good 2 weeks straight! You may be asking yourself, how I had leftovers for 2 weeks, well, it's because our friend group has a lovely tradition of having a pre-Thanksgiving, dubbed Fakesgiving. Our annual Fakesgiving is held the Saturday before actual Thanksgiving and involves great friends, the normal Thanksgiving feast, and lots of wine & beer.

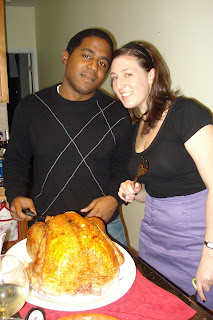
This year, Doug and I hosted and were honored to make the turkey for everyone. We bought a fresh 20 pound turkey the night before and woke up early to fix that bird. I assumed that if the giblets are provided in a package stuffed in the turkey, the neck would be too. This was NOT the case. I had to rip that poor bird's neck out with my bare hands. Now I know that you want the package to say that both the giblets AND the neck are removed, unless you're into ripping the neck out. After that, it came time to prep it. We picked up the skin from the meat and rubbed butter all over the turkey. That was actually my favorite part, weird, I know. After the butter was well spread between the meat and the skin, we rubbed EVOO all over the outside of the bird. Then, we just sprinkled some salt, pepper, rosemary and thyme all over it. We baked it at 325 degrees for 5 hours. We tented it with tin foil for the first hour. Then after removing the tin foil, we let the oven do its thing. We basted it about 3 times, although this is really only need to add to the color of the turkey. After removing it from the oven, we let it rest for 30 minutes, then carved right in. It came out great! I was nervous and being a perfectionist was convinced I messed it up somehow, but everyone loved it!

To make the day even better, all of our friends brought along delicious apps and side dishes. We had garlic mashed potatoes, scalloped corn, stuffing, and homemade cranberry sauce just to name a few! It was an amazing day with close friends and good food. The best way to kick off the holiday season! Here's some pictures:

A funny "family" picture:


A nice one:


Moira trying to eat the turkey! In the background check out Russ's homemade cranberry sauce and my KitchenAid:


Doug and I with our turkey!

Monday, November 23, 2009

Macaron, Not Macaroni!

Recently I have had an obsession with macarons, which is very odd since I don't believe I've actually ever had one. I am not French pro, but according to research I have done, there are macarons and macaroons. Macaroons could be the same thing with the English translation, or they can be a hard coconut or coarse almond paste cookie. Macaron is the sandwich cookie made with egg whites. Here is a picture of each:


I have had an odd obsession with the colorful ones. I just think they're so pretty. Every picture of them I see only makes me want it more! It started a while back when I saw something on TV about Ludaree in Paris. From what I hear, these are the Chanel of macarons. In fact, they even teamed up with Christian Louboutin for designer cookies. They have multiple flavors, which are represented by the different colors. They're a work of art. Being a home baker, I have decided to give these a whirl. I found this website which gave great detailed instructions on how to go about it: http://www.seriouseats.com/recipes/2007/10/how-to-make-macarons-recipe.html . (This recipe took a long time.)

I had some mishaps in my baking. First, I decided Saturday morning that I wanted to make these, and being impatient, I did not let my egg whites sit overnight. I would definitely NOT do the again. Second, I was unable to find ground almonds, so I had to improvise. I bought diced almonds, measured the grams and placed them in a Ziploc bag. I then took all my aggression out and hammered them until they were as close to ground as I could get them. I would recommend this ONLY if you can't find the ground almonds. There were still small chunks I didn't get, and it gave my cookies a speckled look. Also, I think I made the mistake of mixing the batter too much. After pouring in the sugar/almond dry mixture, I think I folded the batter a few times too many. This was probably because I wanted pretty colors, so then divided the batter into 4 bowls and then mixed some gel food coloring in. Next time I will have to remember to take that into account while mixing the entire batch. And lastly, when I was removing the cookies from the parchment paper a lot of them stuck. The bottoms of most of them were not very hard. It made removing them very difficult and caused me to throw out a bunch of cookies.

All in all, my cookies tasted great, but I feel they could have looked better. Have a look for yourself.
Finished product:


Right after they came out of the oven:


Before the oven:

Saturday, November 14, 2009

Fondant Fun!

Last winter I took a basic cake decorating class and LOVED it. Since then, I've used every opportunity I can to show off my skills. Also, the more I do it, the better I get. Last month, I felt the need to step my game up. So I moved into the big leagues and started playing with fondant. I did not venture into making my own yet, but I did add some vanilla extract into the Wilton rolled white fondant to add some flavor. I then used gel food coloring to dye it the colors I wanted. Getting a true red was very hard. I used A LOT of food coloring and still wasn't truly happy with the results. Plus, my hands were red for the rest of the day. I needed black fondant for a Groom's cake I was asked to create, so I also bought a large tub of black, vanilla fondant. I seriously doubt if I would've been able to dye the white fondant black using food coloring.

I had worked with fondant one other time (the open book cake I made for a bridal shower), so I had a little experience. I did the rest from watching so many baking shows and reading up on tips people posted online. I had a hard time at the end polishing the cake to give that WOW factor, but I think I did a pretty good job. Here are the two cakes I made. The Windows logo cake was for a Windows 7 Launch Party that Doug and I hosted and the other was the Groom's cake I mentioned earlier. The heart and skull is the symbol of the band Alkaline Trio and I filled the cake with homemade cannoli filling*. He was very surprised and loved it, which made me and his beautiful bride very happy.


*The homemade cannoli filling, was so easy and delicious I would recommend giving it a whirl. Here's the recipe I used:
3 c. very dry ricotta
1 c. granulated sugar
2 tsp. vanilla
Chocolate chips
Drain ricotta in a colander until very dry, overnight or longer if necessary. Mix with sugar and vanilla. Beat with electric mixer at high speed for 8-10 minutes. Fold in some chocolate chips and use to fill cannoli or between cake layers. Fills about 15-18 cannoli.

Also, make sure to let the filling sit in the fridge to settle. It will be firmer and the flavors will really blend. I also saw this idea online that sounds like a great idea: http://www.bigredkitchen.com/2009/10/cannoli-bites.html. I didn't get a chance to try that, but I am thinking I may try it for Thanksgiving.

Tuesday, November 3, 2009

Mmm Mmm Marinade

The past few times Doug and I made some steaks at home, we used the easy-breezy Jack Daniels Honey Teriayki marinade bags. And they came out delicious. However, I was bored the other night and decided we should try our hand at our own marinade. I've created my own for chicken before (mixing EVOO, white wine, garlic, rosemary, thyme, S&P) and it worked well, so how hard could steak be? I'm a big fan of trying new things and changing recipes when I get them, but Doug likes to follow the book. He looks up recipes and the best ways to cook things, which does pay off, but I'd rather experiment! Why am I telling you this? Because Doug brought home the ESPN Game Day Gourmet cookbook (we <3 football) and that is where I got the idea for my steak marinade. And in true 24 year old fashion, I didn't quite have my pantry stocked, so I got to substitute some ingredients. So here's my version of the marinade (apologies if some things aren't exact):

Few tablespoons of EVOO
Juice of freshly squeezed limes (about 1 and 1/2 limes - what we had in our fridge)
1 Tbsp. honey
1/2 cup red wine (ESPN notes you can sub in JD, brandy, or dark beer)
2 garlic cloves, chopped
1 onion, chopped (we technically only used 3/4 of an onion - again, what we had left)
1 tsp. cinnamon
Pinch of crushed red pepper flakes
1 tsp. salt
1 tsp. black pepper

Simply combine all the ingredients. Place the steak in a Ziploc bag with the marinade and let sit for a day before cooking. Also, we slice the top of the steak a little bit so it's absorbed more. This marinade is enough for 2 lbs. of steak. And feel free to experiment on your own - one example is using lemons instead of limes, that's what ESPN's version calls for!

I should also mention, we live in NYC and do not have a grill to throw this bad boy on. We simply put our oven on broil and cook each side for 6 minutes and then let it rest out of the oven. Also, wrap your pan in tin foil to make clean up A LOT easier.

Throw some veggies and mashed potatoes on the side and you got yourself a great meal!

*Apologies for not taking pictures.

Sunday, October 18, 2009

Take it back now y'all

Over the weekend, Doug and I (along with Meg & Eden, our awesome friends) made a trip to Medieval Times. It was my first time ever going there, but at the age of 24, I'm pretty sure I had just as much fun as the 5 year old sitting next to me. Actually, I may have had more fun since I could sip on a cold beer as I watch the joust. But what does this have to do food? Here, have a look:Our bill of fare was: garlic bread, tomato bisque, roasted chicken, spare rib, herb-roasted potato and a "pastry of the castle." The soup, which was served first, wasn't too hot and was thin enough for us to drink out of our metal bowls - for at the castle, there are no utensils (although I'm sure the king used a fork and spoon, but whatever). I personally used my garlic bread to dip into the bisque and thought it made it even better. We were then served half of a baby chicken, as you can see in the picture. I must say, this chicken was delicious. Even the meatiest part of the chicken managed to stay juicy. I do wish that I had access to a fork because it did get a little messy, but it did not take away from the goodness. After being served the chicken, they then came around and added a spare rib (yes, a single rib) and half of a potato that had been herb-roasted. The spare rib was smothered in a BBQ sauce, which was very good but I thought it was a little bit of an odd thing to throw in. I wish I could say that I had the stamina to finish all the food, but I had to give up. And just when I thought my fullness wouldn't let me eat for the rest of the night or the next day, they brought out the pastry of the castle. It turned out to be an apple turnover, and I don't think I have ever been able to say no to that. I only had a few bites, but was surprised at how light it was. There was no sugar frosting on top of it and it was not over stuffed with apple filling. I wish I could've taken it with me but I didn't want to throw it in my bag without wrapping it up.

In conclusion, GO TO MEDIEVAL TIMES. I think it would be best to go in a larger group and have a couple of beers. It's entertaining and wholesome fun. And while I can't speak to what peasants and serfs ate back in ye olde days, the guests of the kings ate hearty and were merry!

Thursday, October 15, 2009

Guess who's back

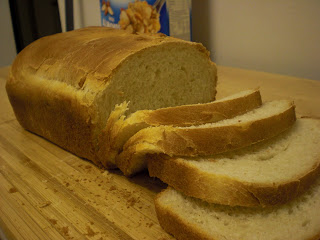
Hey y'all. The summer plus the loss of my laptop hasn't really enabled me to post. But I'm back and ready to get serious. Just to catch you up, here's some recent treats I made. More posts to come, so check back:


Tuesday, June 30, 2009

Philly in New York?

So I don't know about you guys, but I often find myself stopping on the Food Network in awe of half of the stuff professionals and amateurs are making. One of my favorite chefs happen to be Bobby Flay whose expertise happen to be in grilling which also happens to be some of the best food you can make in my opinion.

However, living in NYC without a backyard or rooftop access makes it very difficult (read: impossible) to grill. So instead, I often look to my stove and a pan to do my "grilling."

Today I decided I wanted to try my "chops" at a Philly Cheese steak and I can report, it really isn't difficult or time consuming at all. Let's break it down:

I hit the supermarket and purchased USDA round ribeye steak sliced thin. I highly recommend doing this instead of cutting it yourself. I personally like my cheese steak pretty straight forward so the only other things I picked up were an onion, green peppers, American cheese and of course, French bread. (Make sure you pick a good break for this as too soft the hero will get soggy, too hard, and you simply won't enjoy the sandwich as much).

So I got home and got my equipment: A 12" stainless steel pan, cutting board, bowl and a knife.
First step was to cut up the onion and peppers. I used half of a bell pepper and a whole small onion. I then put a bit of olive oil in the pan and set the heat to high. First, I threw the onions in:
(click to enlarge)

A word of warning, you are going to get some sizzle and pop from the oil, just be careful as you saute your onions. You want them cooked enough where they are limp and lose their normal "crispness."

I then added the bell peppers and sprinkled a bit of black pepper on to it:
(click to enlarge)

Next I took out the steak and laid them on my cutting board. I decided to not marinade these as I thought the flavor from the caramelized onions and peppers along with the cheese would be plenty. I did sprinkle a bit of salt and pepper on both sides however.
I then moved the peppers and onions into a side bowl. I threw a bit more olive oil in the pan and placed the pieces of steak on the pan. Don't go to far from the pan as the steak will cook very quickly. I'm talking about maybe about 30 seconds on each side.

Once I flipped the steak I tossed the onions/peppers back in the pan and then proceeded to cut the steak (which is why I went with a stainless steel pan vs. non-stick). I then placed two slices of American cheese over the mound of meat and veggies.
(click to enlarge)
(side note. Feel free to use any kind of cheese you want. Provolone is another popular choice, or the classic Philly Cheesesteak style of using Cheese Whiz. In that case, just put the cheese directly on the bread).

I then placed the bread over the food and used that and a spatula to scoop the steak mixture onto my bread. And here is the finished product:


(click to enlarge)

This literally took me 15 minutes to complete and I can confirm it was delicious. I bought enough for 2 sandwiches and the cost came out to about $10.
If you decide to give this a go, comment back with how you made it and how it came out.

Until next time....

Monday, May 18, 2009

Hold the pickles, hold the lettuce...

For lunch the other day, a friend and I decided to test out the newly opened HB Burger on 43rd St, between Broadway and 6th ave. Surprisingly bigger than it seems, this is a great lunch spot. Owned by Heartland Brewery, they not only serve those delicious lagers, they serve their own homemade sodas as well. And the best part, nothing on the menu is over $9!

Now, I've only eaten burgers for a little over a year, so as a late-comer in the burger game, I do not believe I know what the BEST burger is. But I know I've had some DAMN GOOD ones. I also know I've had some OK ones. I've had dry turkey burgers before and I did not like it. I prefer a nice, juicy burger. So when I ordered the Taco Turkey Burger from HB, I was a bit nervous that I might be let down. Well, I was not! It was absolutely delicious. The turkey burger was cooked wonderfully, still juicy! Topped with jalapeno jack cheese and homemade salsa, it wasn't too much in between the bun. Now, I'm used to a burger and fries, but to keep their plate prices down, HB sides have to be ordered separately. My friend and I ordered fries and tater tots. Once again, we were not disappointed. It was easy to see the fries were from freshly cut potatoes and fried. Meanwhile, the tater tots had bits of bacon and jalapeno jack cheese blended in, but the flavors did not take over. Ordering both sides was a bit much for lunch, we didn't come close to finishing them, but who knows how hungry you are!

Overall, HB Burger was a great lunch, and we were in & out within 45 minutes. Their menu is mainly burgers (obvi), but they do have a few other items. One other item is the World's Smallest Sundae. We didn't try this (we were busy with the tater tots) but saw it being served at another table. It looks as if it is your basic hot fudge sundae, served in a shot glass. Just the right amount of sweetness after a meal!

I recommend this spot for a good burger (turkey burger too). Also, I'd like to add that I love Five Guys for a burger too. Doug should be blogging about that soon, and he'll have a pic from when we went last week.

Tuesday, May 5, 2009

A bit of bragging, but at least you get a recipe.


In honor of the 24th year of my life, my parents lovingly bought me a KitchenAid Stand Mixer in apple green. This beauty automatically makes my kitchen look better and puts a smile on my face when I look it. After dreaming of it for so long, I just had to make something immediately. But what? Something that would be a pain in the butt to make without it, something that's delicious. Pizza? PIZZA!


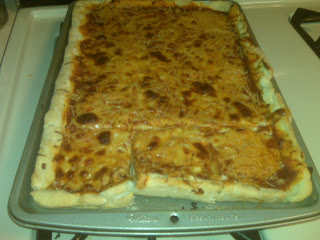
Substituting a cookie sheet for a pizza pan, we (Doug helped) made a great Sicilian pizza. We kept it just sauce and cheese for our first run and it came out delicious. I'd like to experiment with different toppings in the future, but for now, original works. If you'd like to try it on your own, here's the recipe for the dough we used:

Ingredients
1 (1/4 ounce) package active dry yeast
1 cup warm water (we added a couple of drops as it mixed, as necessary)
1/2 teaspoon salt
2 teaspoons olive oil
2 1/2-3 1/2 cups all-purpose flour
Some corn meal for sprinkling on the pan

Directions
1. Dissolve yeast in warm water in warmed bowl.
2. Add salt, olive oil, and 2 1/2 cup flour.
3. Attach bowl and dough hook, turn to speed 2 and mix 1 minute.
4. Continuing on speed 2, add remaining flour, 1/2 cup at a time, until dough clings to dough hook and cleans sides of bowl. Knead on speed 2 for 2 minutes.
5. Place in greased bowl, grease the cover as well.
6. Cover, let rise in warm place until doubled in bulk (about 1 hour).
7. Punch dough down.
8. Brush 14 inch pizza pan with oil and sprinkle with corn meal.
9. Press dough across bottom of pan forming collar around edge to hold filling.
10. Top with fillings and bake at 450°F for 15 to 20 minutes.

Makes 1 14 inch pizza


Monday, May 4, 2009

An evening with Spitzer... not Elliot.

This weekend I had the pleasure of dinning at a place that is fast becoming one of my favorites: Spitzer's Corner, fittingly located at the corner of Ludlow and Rivington.  This "American Gastropub" serves up some delicious food and drink and is a great destination for showing friends a good time.  If you haven't had a chance to investigate, a gastropub serves up high quality food a level above the typical "pub grub".  As an example, Spitzer's menu includes items such as hand-cut French Fries, Truffle Mac and Cheese, Braised Pork Belly, and a Kobe Beef Burger.  The beer list at Spitzer's features an extensive variety of foreign and domestic beers (including my arch nemesis: Delirium Tremens), complete with great descriptions of how each should taste - Eric would like to give a special shout out to the Peak Organic Espresso Amber Ale, which smelled amazing.  If beer isn't really your thing, the wine list certainly hasn't been neglected and there is also a full bar.  The atmosphere is another reason why I love to bring visitors here.  Long communal tables give the place a beer hall feel, while the wood panels almost make you feel like you’re in a spa.  But on nice days they open all the windows, giving the dinning room an open and airy feel.  It can get a bit loud, and my parents complained about having to yell, but it’s normally a younger crowd, so they tend not to mind.  On Saturday I met my cousin Rory and his wife Elizabeth who were visiting from Ireland at Spitzer's.  I picked it because I know the food will be delicious, but also not intimidating (the Irish are not what most would consider culinary adventurers).  I had the PBLT, braised pork belly with lettuce and roasted tomatoes.  The pork was so tender, it barely required a knife, and very tasty.  Rory had the Hickory Short Rib Burger, a favorite of my boyfriend Eric's, and Elizabeth had the Black Angus Steak Salad - I’m pleased to report everyone enjoyed their meals.  As one might imagine with Irish cousins, the drink was flowing copiously, and we probably cleaned them out of Pinot Grigio.  They do serve brunch, which I haven't tried yet, but seeing as that is my absolute favorite meal, better believe I will be tasting that soon!  Cozy up next to your fellow New Yorkers and the conversation will flow with the help of some great beers and fine food.  Spitzer's Corner

Monday, April 27, 2009

Sangria is for Me-a


Last week Doug (my fellow blog contributor and boyfriend) and I went out to dinner at Mojave, located on 31st Street in Astoria, NY. Located right at the last stop of the N/W train, the relaxing decor and dim lighting quickly make you forget the outside noise. The place was not too crowded (it was a Wednesday) and they had a man with a guitar singing Frank Sinatra songs in Spanish. While he was playing, I thought the music was a bit loud (Doug disagreed), but it was still bearable. They started us off with some blue corn tortilla chips and 2 different salsas. I'm sad to report that a few of the chips (very few, but still worth noting) tasted a bit stale. We then started ourselves off with a pitcher of their red wine sangria. Mmm, mmm. The sangria is loaded with apples and is the reason I chose the place, I would recommend it to all.

For starters we ordered the guacamole. Now, neither Doug nor I are crazy guac people. We both can either take or leave it. However, since having some at Rosa Mexicano (http://www.rosamexicano.com), I've been willing to try at other restuarants. I have to say, Mojave is the second best guac that I've had, the first being Rosa Mexicano. We just about cleaned the plate and our food arrived. Doug ordered the Blue Corn Enchilladas with Chipotle Chicken Breast (which I have gotten before and like, but I will let him write about it if he desires), and I ordered the Salmon Tacos. The Salmon Tacos were delicious with a hint of sweetness coming from chopped up pineapples mixed into the taco. It came served with rice, sour cream (can you ever have enough?) and more guac. The rice, to me at least, tasted the same as most Mexican restuarants, which is good. I usually prefer to see what's in the taco, but they came "face down," so as I cut them and bit into them, I did not know what to expect. There was quite a bit of salmon wrapped in those bad boys (you get two) and they were cooked medium-rare to medium. I was full after one and brought the second one home, it was just as good the next day!

I'm sorry to report that we did not venture into their dessert world. A pitcher of sangria, guac, and an entree did not leave much room for that. However, they have a chocolate fondue on the menu that sounds delicious. Next time I'm there, you know what I'm saving room for!

I took a picture of the tacos (taken from my BB, so pardon the quality).